接入XRMOD(objectivec)

下载 XRMOD Engine
增强您的应用程序的第一步是获取我们的 SDK! 我们已将 XRMOD Engine 上传到 github。您可以点击此处前往 github 页面并下载我们的 XRMOD Engine。如果您认为 XRMOD 不错,请给我们一颗星。谢谢!
导入 XRMOD 框架
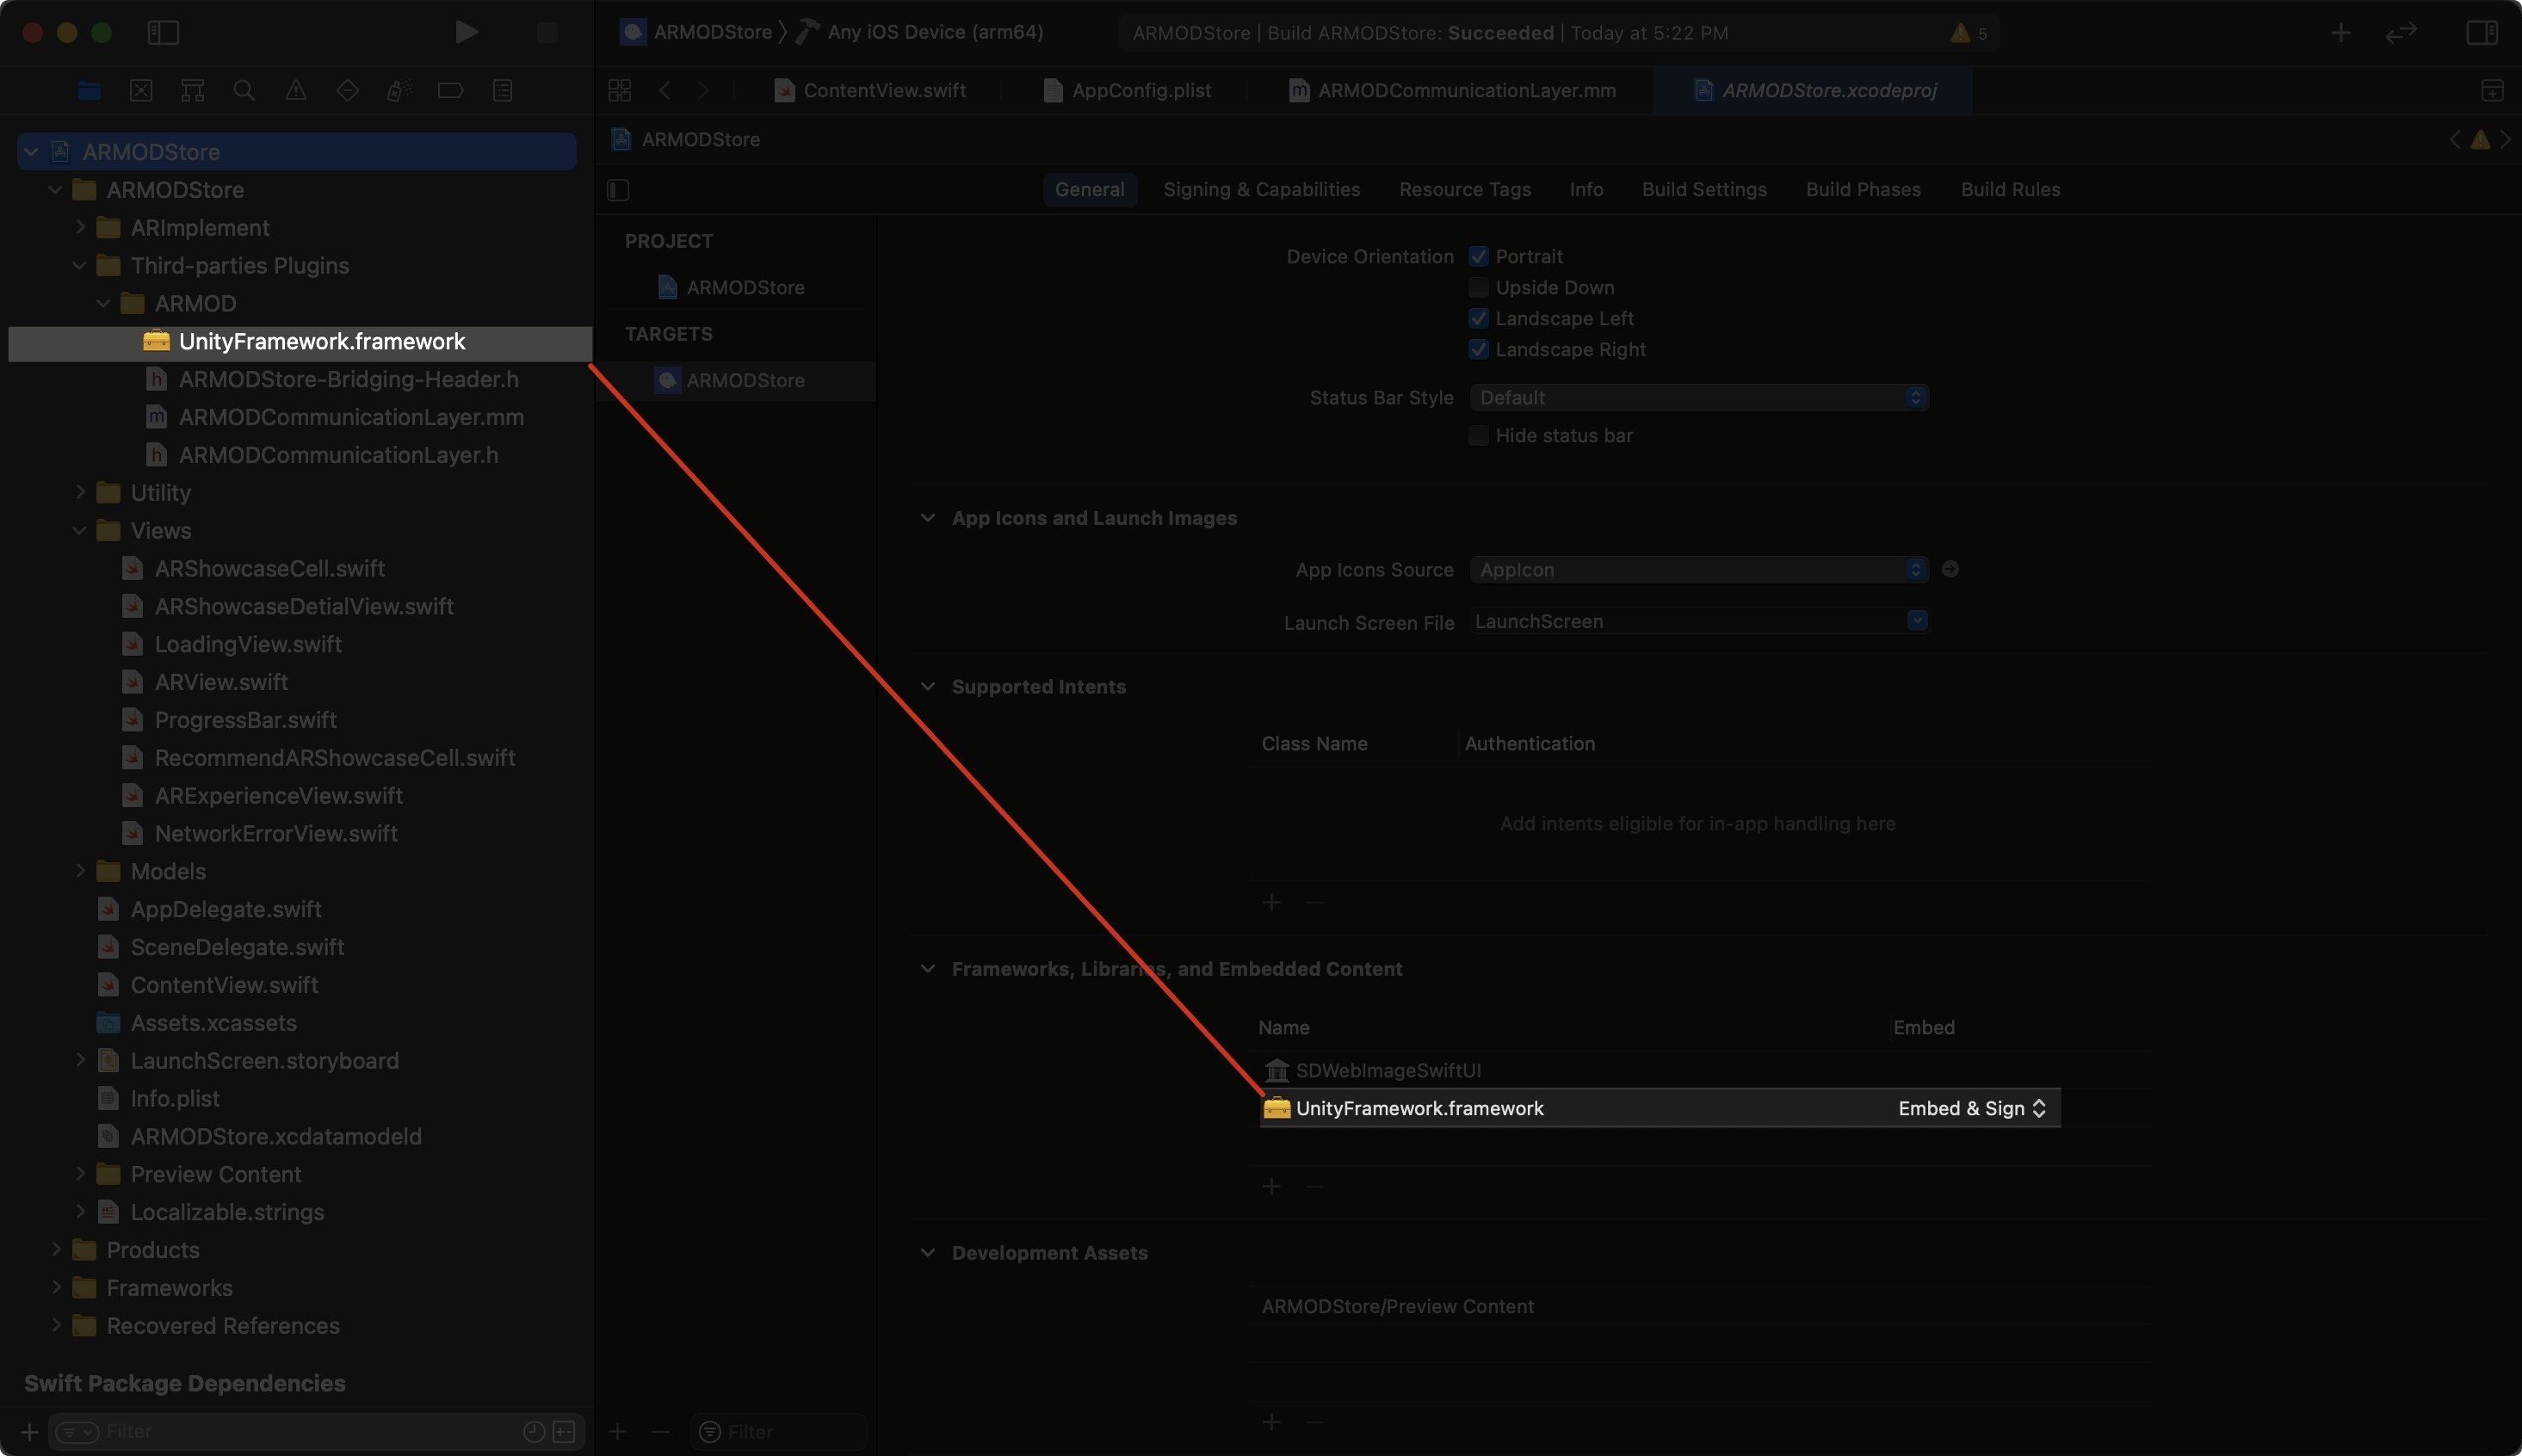
将 XRMOD SDK 和脚本拖放到您的项目中。

这个图片来自 SwfitUI 项目。所以它有 ARMODStore-Bridging-Header.h 文件
| Name | Description |
|---|---|
| UnityFramework.framework | 这是核心库,所有的 AR 算法都在其中。 |
| ARMODCommunicationLayer.h | XRMOD SDK 的 iOS 功能接口 |
| ARMODCommunicationLayer.mm | 实现 XRMOD SDK 的 iOS 功能接口 |
ARMODCommunicationLayer.h 和 ARMODCommunicationLayer.mm 是 Unity 交互的连接层,也被称为胶水代码。
将 XRMOD UnityFramework.framework拖到Framework,Libraries,and Embeded content部分。并设置嵌入类型为嵌入和签署。像这样。

嵌入编码
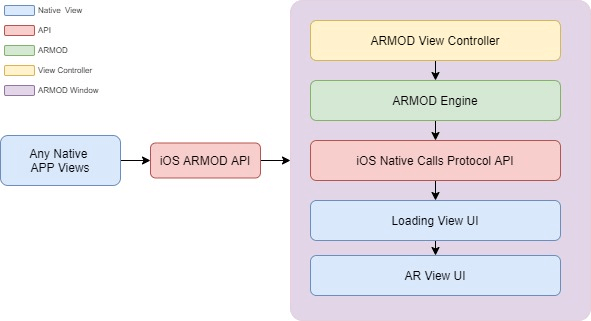
在我们开始之前,我们必须弄清楚 XRMOD 和 Native 应用程序之间的关系。
- 首先要明确的是,XRMOD 不包含任何用户界面
- XRMOD 只允许您插入视图或堆栈
- UI 事件和数据只由 iOS Native Calls Protocol API 通知。
- UI 操作事件只由 iOS XRMOD API 通知 XRMOD 引擎。

由于本地应用程序不能直接监控 XRMOD 的状态,如下载资产状态、进度、ErrorAlert 等,我们只能实现 XRMOD 回调方法来监控 XRMOD 的状态。
项目设置
现在我们需要把它嵌入到我们的本地应用程序中。编辑main.mm文件,并在其中添加新的一行。
//
//  main.m
//  ARDemo
//
//  Created by Phantomsxr.com on 2020/10/26.
//

#import <UIKit/UIKit.h>
#import "AppDelegate.h"
#import "NSObject+XRMOD.h"
int main(int argc, char * argv[]) {
    NSString * appDelegateClassName;
    @autoreleasepool {
        // Setup code that might create autoreleased objects goes here.
        appDelegateClassName = NSStringFromClass([AppDelegate class]);
    }

    //Add new line
    [[XRMOD sharedInstance] connectArgcArgv:argc setgArgv:argv];
    return UIApplicationMain(argc, argv, nil, appDelegateClassName);
}
编辑 AppDelegate.m 文件。找到(BOOL)application:(UIApplication )application didFinishLaunchingWithOptions:(NSDictionary )launchOptions 并在这个函数中添加一些代码。
#import "ARMODCommunicationLayer.h"

- (BOOL)application:(UIApplication *)application didFinishLaunchingWithOptions:(NSDictionary *)launchOptions {
    // Override point for customization after application launch.

    //New Line added
    [self.window makeKeyAndVisible];
    [[XRMOD sharedInstance] connectARMOD:self.window];
    [[XRMOD sharedInstance] connectLaunchOpts:launchOptions];

    return YES;
}
iOS13 或以上
转到SceneDelegate.m文件并编辑它。
#import "ARMODCommunicationLayer.h"
- (void)scene:(UIScene *)scene willConnectToSession:(UISceneSession *)session options:(UISceneConnectionOptions *)connectionOptions {

    // Use this method to optionally configure and attach the UIWindow `window` to the provided UIWindowScene `scene`.
    // If using a storyboard, the `window` property will automatically be initialized and attached to the scene.
    // This delegate does not imply the connecting scene or session are new (see `application:configurationForConnectingSceneSession` instead).

    //    self.window =[[UIWindow alloc] initWithFrame:[UIScreen mainScreen].bounds];
    [[self window] makeKeyAndVisible];

    //New Line
    [[XRMOD sharedInstance] connectARMOD:self.window];
}
实现回调
启动 AR
因为每次启动 XRMOD 时,您都需要传递信息来初始化 SDK,以便验证您相应的账户。 我们需要调用以下一行代码进行初始化。由于 XRMOD 初始化接口只支持 JSON 格式的数据,您可以使用您喜欢的数据格式将其转换为 json,然后传入此方法。
//Configure AR SDK. We need to convert the dictionary to NSString and then pass it to our SDK.
[self.armod initARMOD:[self convertToJsonData:appConfigDict]];
这个函数可以帮助我们将 NSDictionary 转换成 Json 格式。
/// Convert dict to json string
/// @param dict dict
/// @return Json string
- (NSString *)convertToJsonData:(NSDictionary *)dict
{
    NSError *error;
    NSData *jsonData = [NSJSONSerialization dataWithJSONObject:dict options:NSJSONWritingPrettyPrinted error:&error];
    NSString *jsonString;

    if (!jsonData) {
        NSLog(@"%@",error);
    } else {
        jsonString = [[NSString alloc]initWithData:jsonData encoding:NSUTF8StringEncoding];
    }

    NSMutableString *mutStr = [NSMutableString stringWithString:jsonString];
    NSRange range = {0,jsonString.length};
    [mutStr replaceOccurrencesOfString:@" " withString:@"" options:NSLiteralSearch range:range];
    NSRange range2 = {0,mutStr.length};
    [mutStr replaceOccurrencesOfString:@"\n" withString:@"" options:NSLiteralSearch range:range2];

    return mutStr;
}
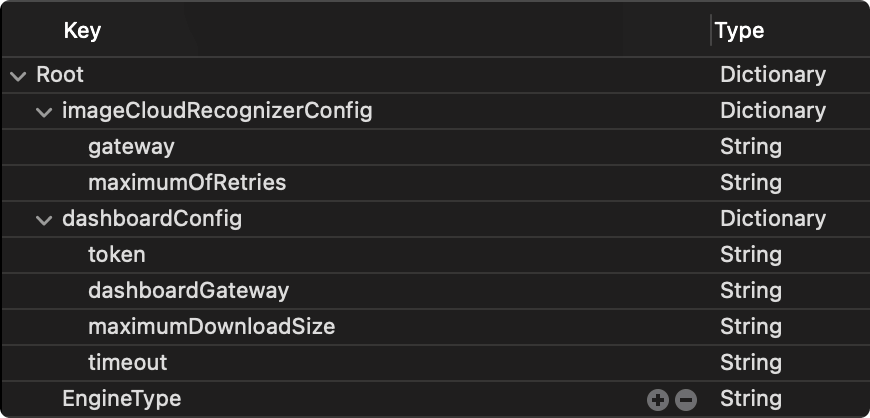
在这里我们创建一个plist文件来保存我们的初始化数据。将其称为AppConfig.plist

imageCloudRecognizerConfig 还不被支持,所以您可以忽略它。
这是我们的 Json 格式。您必须与这个格式保持一致!。
{
  "dashboardConfig": {
    "token": "YOUR_APP_TOKEN",
    "dashboardGateway": "ARMOD_GATEWAY_URL",
    "timeout": 30,
    "maximumDownloadSize": 30
  }
}
| Key | Value Type | Description |
|---|---|---|
| dashboardConfig | String | Root name. |
| token | String | 用于认证。 |
| dashboardGateway | String | http 请求的 URL。 |
| timeout | Int | Http 请求超时 |
| maximumDownloadSize | Float | AR 体验包的最大下载尺寸。如果超过这个值,(void)packageSizeMoreThanPresetSize:(float)currentSize preset:(float)presetSize 方法将被响应。 |
| EngineType | String | 用于告知 AR MOD SDK 目前在什么环境下运行。如果是基于 Unity 的二次开发,需要填写 Unity。 |
我们可以在Main.storyboard中添加一个Button和UITextField,并添加按钮的事件。像这样。
- UITextField将被用来输入我们的AR体验的UID。
- 按钮将被用于启动AR。
将ButtonEvent方法分配给我们的AR启动按钮。
/// Launch AR button event
/// @param sender button
- (IBAction)ButtonEvent:(UIButton *)sender {
//    NSLog(@"Hi,You are tapping the AR-Luancher button!");

    //load the application config file (property list) for AR SDK
    NSString *appConfigFilePath = [[NSBundle mainBundle] pathForResource:@"AppConfig" ofType:@"plist"];
    NSDictionary *appConfigDict = [NSDictionary dictionaryWithContentsOfFile:appConfigFilePath];

    //ARSDK is a singleton
    self.armod = XRMOD.sharedInstance;

    //SDK event register,e.g. download asset event,Not Support event and so on.
    [self.armod registerAPIforNativeCalls:[ARViewExtension alloc]];

    //Configure AR SDK. We need to convert the dictionary to NSString and then pass it to our SDK.
    [self.armod initARMOD:[self convertToJsonData:appConfigDict]];

    //Set the ar view to follow the orientation of the app itself
    [self.armod setUIInterfaceOrientation:(int)self.orientationState];

    //Init show the AR view
    [self.armod loadAndShowARMODView];

    //Fetch data
    [self.armod fetchProject:self.projectId];

    self.arViewUI = [[ARViewUI alloc] init];
    [self.arViewUI createARViewButton:self.armod];
}
XRMOD UnityFramework不支持Bitcode
总结
更多关于Native API的信息,您应该阅读iOS Native Calls Protocol API。我们把这个Native OC项目的样本项目上传到github。现在您可以从github下载我们的源代码项目。
常见的错误
__mhexecute_header
- 移除 s.pod_target_xcconfig = { 'OTHER_LDFLAGS' => ['-ObjC'] }
- 添加 libc++.tbd
UILaunchStoryboardName
@"UILaunchStoryboardName key is missing from info.plist"),
function ShowSplashScreen, file /Users/*/Documents/*/*/
ARMODs/Unity/XRMOD-iOS-Unity/XRMOD-iOS/Build/U201904/
Classes/UI/SplashScreen.mm, line 186.
将UILaunchStoryboardName字段添加到您项目的plist中。