Embed SDK Unity

Installation
Once our Unity project has been created, we need to convert the platform to the one you need to develop on.
Get the basic development environment by reading the XR Experience Content Development Kit Installation article.
Launch XRMOD
We create a new Unity Scene and save it (the name of the Unity Scene needs to be changed during the saving process, which is replaced by App, which can be named according to your own preferences.), then add the Unity Scene to the Build Settings and set its order. For the first position, the index is 0.
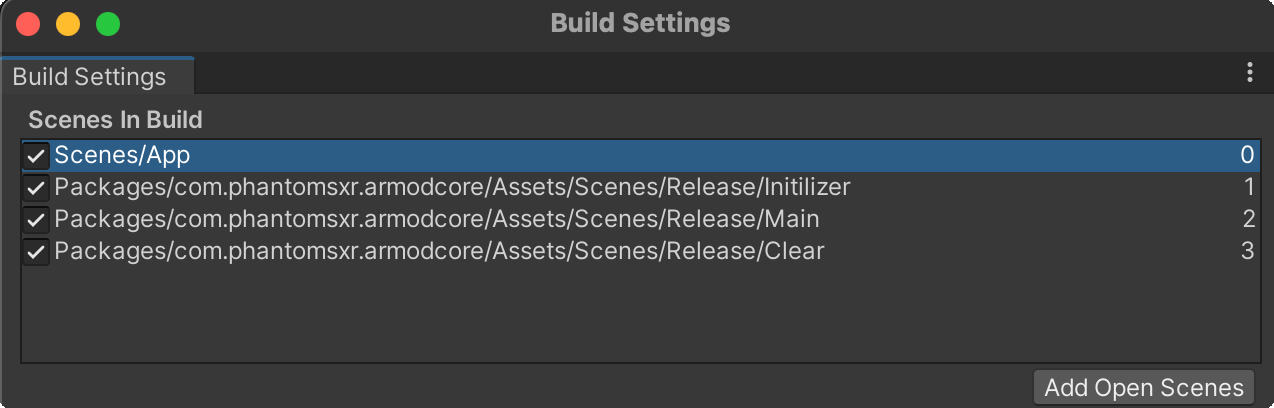
- Don't remove
Initilizer,MainandClearscenes, otherwise it will not working. - Please make sure the name of the newly created scene is not the same as the above three scene names (make sure it is unique)
There is a folder named Scripts in the Project panel. Give the ProjectNameXRMODBootstrap.cs script in the folder to your scene GameObject. Each field on this component is explained below:
| Name | Type | Description |
|---|---|---|
| dashboardConfig | String | Configure |
| token | String | User authenticate |
| dashboardGateway | String | Dashboard gateway |
| timeout | Int | Timeout for http request |
| maximumDownloadSize | Float | The maximum download size of the AR experience pack. If this value is exceeded, the (void)packageSizeMoreThanPresetSize:(float)currentSize preset:(float)presetSize method will be responded to |
| EngineType | String | It is used to tell what environment the AR MOD SDK is currently running in. If it is based on Unity secondary development, you need to fill in Unity. |
| AppModel | String | The mode used to distinguish the current App is divided into three cases: Online-interconnection with Dashboard, Offline-not connected to the Internet by loading local content, Simulator--for Unity Editor |
| ProjectUID | String | Your project ID hosted in XRMOD Cloud. |
How does the launcher work?
- Calling SDKInitialization.Initialize to initialize XRMOD sdk and delay 125ms
- After 125ms we calling FindObjectOfType to get SDKEntryPoint
- Build and configure SDKConfiguration and pass in by SDK EntryPoint.
- Calling SDKEntryPoint.Init and SDKEntryPoint.LaunchXRQuery to start XR and load the content.
To use SDKEntryPoint.LaunchXRQuery, you need to pass in the project id or project name
using SDKEntry.Runtime;

public async void ARModuleStart(){

    // Reinitialization
    SDKInitialization.Initialize();

    await Task.Delay(125);

    // Init and launch
    SDKEntryPoint tmp_Entry = FindObjectOfType<SDKEntryPoint>();
    SDKConfiguration tmp_Configs = new SDKConfiguration
    {
        engineType = EngineType.Unity,
        dashboardConfig = new DashboardConfig {token = "", dashboardGateway = $"GATEWAY"},
        customConfig = new CustomConfig(),
        imageCloudRecognizerConfig = new ImageCloudRecognizerConfig(),
        AppModel = AppModel.Online
     };
    tmp_Entry.InitSDK(JsonUtility.ToJson(tmp_Configs));
    tmp_Entry.LaunchXRQuery("PROJECT UID");
}
If you chose our XRMOD cloud, you can typing https://phantomsxr.cn/api/v2/getarresource for the dashboardGateway field.
Close XRMOD
Since it can be turned on and off on demand, xrmod allows you to call Dispose to turn off XR.
public void DisableAR(){
    var tmp_SDKEntryPoint = UnityEngine.Object.FindObjectOfType<SDKEntryPoint>();
    tmp_SDKEntryPoint.Dispose();

    // Reload the Main scene for ready
    SceneManager.LoadScene("Main");
}
Managed code stripping
During the build process, Unity removes unused or unreachable code through a process called managed code stripping, which can significantly decrease your application’s final size. Managed code stripping removes code from managed assemblies, including assemblies built from the C# scripts in your project, assemblies that are part of packages and plugins, and assemblies in .NET Framework.
Unity uses a tool called the Unity linker to perform a static analysis of the code in your project’s assemblies. The static analysis identifies any classes, portions of classes, functions, or portions of functions that can’t be reached during execution. This analysis only includes code that exists at build time because runtime generated code doesn’t exist when Unity performs the static analysis.
You can configure the level of code stripping Unity performs for your project using the Managed Stripping Level setting. To prevent Unity removing specific parts of your code, use annotations to indicate which parts of your code base the Unity linker should preserve. For more information, see Unity linker.
Build app
Now you can open BuildSetting window to build your app via File->BuildSettings.
XRMOD experience scripts cannot directly call third-party methods or developer-defined script methods. However, we also provide a way to do this, click here to ready more.
Summary
Since then, our AR-APP has been completed. Using the XRMOD Engine has saved us a lot of time, and saved us the logic and knowledge of how to interact with the XR SDK. The next step is to create a beautiful UI/UX and XR experience for it. content. If you don't know how to make content, you can click here to read it.
Unity ClassIDReference: https://docs.unity3d.com/Manual/ClassIDReference.html Unity Assemblies: https://docs.unity3d.com/ScriptReference/UnityEngine.AIModule.html