How To Interact With UI
In How to load assets section, we leaned how to load art assets via CSharp scripting.In this section, we will continue using the project from the previous section. And discuss how to use UGUI in XRMOD Engine.
Build Interface
- Right-click on Hierarchy panel
- Select
UI->Button-TextMeshProto create a new UGUI interface and rename the button toClickMe - Rename the
ClickMebutton's parent(--Canvas) toUICanvas - Set the
ClickMebutton's label fromButtontoClickMe
Adaptive screen
we need to select the UICanvas game object and find CanvasScaler.
- Set UI Scale Mode from Constant Pixel Size to Scale With Screen Szie
- Set Reference Resolution from
800x600to1080x1920 - Set Match from
0to1 - Resize the ClickMe button and and adjust the position
- Set the ClickMe button RectTransform anchor to Bottom
Become A Prefab
Drag-and-drop EventSystem to UICanvas, set the parent node of EventSystem to UICanvas. Then drag-and-drop UICanvas from Hierarchy to your YOURPROJECT/Artwork/Prefabs
Q: Why should EventSystem be a child of UIcanvas?
A: Because UGUI need an EventSystem to recived our input
Collection Assets
- Open PackageToolsEditor
- Switch to Contents section
- Drag-and-drop UICanvas from
YOURPROJECT/Artwork/Prefabsto Contents of PackageTools Editor
Interact
As in the How to load assets section, double-click to open the YOURPROJECTMainEntry.cs file in YOUR PROJECT/Scripts/Runtime/.
Write some code for it.
using System;using UnityEngine;using System.Collections;using com.Phantoms.ARMODAPI.Runtime;using com.Phantoms.ActionNotification.Runtime;using Object = UnityEngine.Object;namespace HowToCreateProject.Runtime{ public class HowToCreateProjectMainEntry { //XRMOD API internal static API ARMODAPI = new API(nameof(HowToCreateProject)); public async void OnLoad() { var tmp_ARVirtualObjectPrefab = await ARMODAPI.LoadAssetAsync<GameObject>("VirtualObject"); Object.Instantiate(tmp_ARVirtualObjectPrefab); var tmp_UICanvasPrefab = await ARMODAPI.LoadAssetAsync<GameObject>("UICanvas"); var tmp_UICanvas = Object.Instantiate(tmp_UICanvasPrefab); var tmp_ClickMeGo = tmp_UICanvas.transform.Find("ClickMe"); var tmp_ClickMeBtn = tmp_ClickMeGo.GetComponent<Button>(); tmp_ClickMeBtn.onClick.AddListener(() => { Debug.Log("Clicked me!!!"); }); } }}Description
- Lines 21->22 of the code above are loading and instantiating our UICanvas,
- Line 23 is for finding our ClickMe object,
- Line 24 is to get the Button component of our ClickMe game object
- Line 25 adds an event callback for the button click
Build XR-Experience
- Go to PackageToolsEditor
- Switch to Build section
- Select the platform you need to build.
- Click the Build AR-Experience button to start the build
Build Platform and Platform Group The two selected platforms must be the same.
Testing
Now we have done all the work, but we don't know if the content loads properly yet, so we need to test further to verify our results.
How to testing?
XRMOD Engine currently provides processes such as loading tests within the Unity Editor, so we can verify all logic from within the Unity Editor. Before we can start testing we need to install the XRMOD Engine Simulator plugin via the Unity Package Manager.
Click here to learn how to install the XRMOD engine toolchain.
In here, we need to install XRMOD Engine Simulator plugin.
When you finish the installation you can see an XR button in the top left corner of the Unity editor, which is mainly used to start the XRMOD Engine emulator.

Launch Simulator
- Click left-top XR Play button to launch XRMOD Engine simulator
- Switch to Game view
- Typing your project name into simulator
- Click Fetch Project to loading our project
Summary
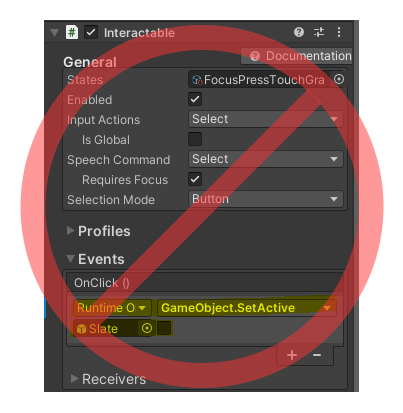
In this section we learned how to interact with UI in XRMOD Engine. It is clear that it is consistent with Unity's workflow. But why haven't we talked about a different kind of workflow(Drag and drop to add events) for Unity?The explanation is as follows:
XRMOD Engien does not support drag and drop of custom MonoBehaviour into our game objects. So we can only add response events to the Button by means of code.